Wiring a boat battery switch is a crucial task that ensures your boat’s electrical systems function reliably.
What is a Boat Battery Switch?
Before diving into the details of how to wire a boat battery switch, it’s important to understand what a boat battery switch is.
A boat battery switch is a device that allows you to control the power supply from one or more batteries.
- It enables you to disconnect the batteries when not in use.
- It helps prevent battery drain during inactivity.
- It can also allow you to switch between multiple batteries or isolate specific batteries for maintenance.
Understanding the purpose and functionality of the switch is foundational for safely undertaking the process of wiring.
What Tools and Materials Do You Need?
When learning how to wire a boat battery switch, having the right tools and materials on hand is essential for a safe and effective installation.
Here’s a list of what you’ll need:
Tools:
- Wrench set (appropriate sized for the battery terminal connections)
- Screwdriver set
- Wire strippers
- Power drill (optional for mounting)
- Multimeter (for electrical testing)
Materials:
- Boat battery switch (ensure it’s marine-rated)
- Electrical wires (choose the correct gauge based on the load)
- Fuses (to prevent overcurrent)
- Heat shrink tubing (for insulation)
- Cable ties (for organization)
How Do You Prepare for the Installation?
Preparation is key when learning how to wire a boat battery switch safely.
Here’s what you need to do before you start:
-
Read the Manufacturer’s Instructions:
– Each switch may come with specific wiring diagrams and instructions. -
Turn Off All Electrical Systems:
– Disconnect power before starting any work to prevent accidents. -
Identify the Battery Setup:
– Determine whether you are using one battery, multiple batteries, or dual battery systems. -
Plan Your Wiring Layout:
– Visualize how you will run the wires and ensure that they will not be in places that might cause wear or short-circuiting.
How Do You Wire a Boat Battery Switch?
Now that you are prepared, let’s delve into the step-by-step process of how to wire a boat battery switch.
Step 1: Disconnect the Battery
Safety first! Always disconnect the negative terminal of the battery to prevent any electrical shock or short circuits.
Step 2: Mount the Switch
- Select an appropriate location for the switch that is easily accessible but protected from exposure to water.
- Using screws, securely attach the switch to the chosen location on your boat.
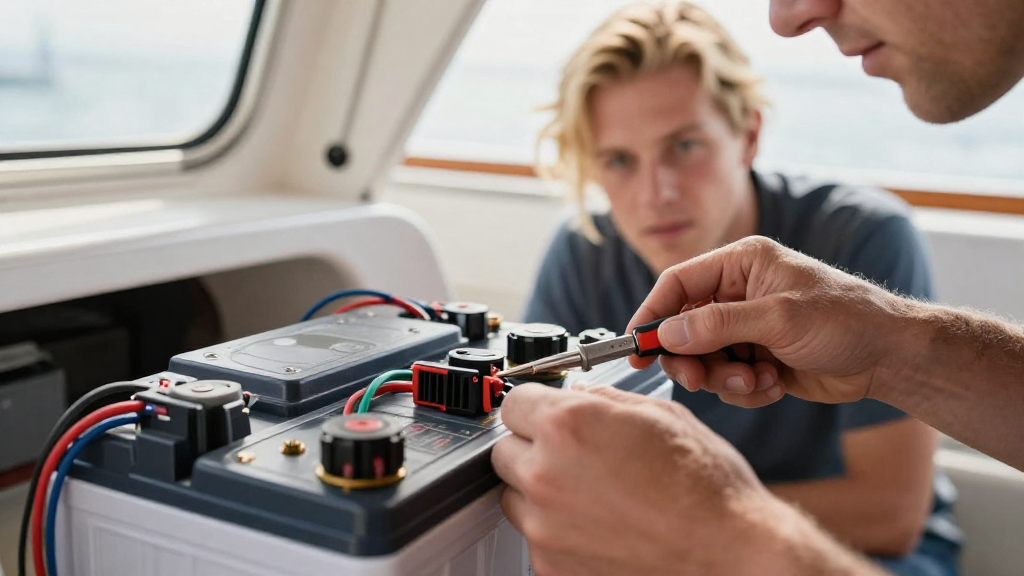
Step 3: Connect the Wires
The next step in learning how to wire a boat battery switch involves attaching the wires following these steps:
-
Identify and Connect the Battery Wires:
– Connect the battery positive wire (usually red) from the battery to the terminal marked “Battery 1” or “Common.”
– If using multiple batteries, repeat for “Battery 2” if present. -
Connect the Load Wires:
– Connect the load wires (going to the boat’s electrical system) to the terminals labeled “Load.” -
Ensure Secure Connections:
– Use a wrench to tighten down the connections to avoid any loose wires that can lead to malfunction or short circuits.
Step 4: Add Fuses
- It is highly recommended to add fuses between the batteries and the load, if not already integrated into the battery switch system.
- Choose a fuse rating appropriate for your system load to protect against overcurrents.
Step 5: Insulate and Secure the Wires
Wiring insulation is critical for safety.
- Use heat shrink tubing to cover any exposed wire connections.
- This prevents unintended contact that may result in shorts.
- Use cable ties to organize and secure the wires along the hull, keeping them clear from moving parts.
How Do You Test the Battery Switch?
After wiring up your boat battery switch, it’s essential to verify that everything is working correctly.
-
Reconnect the Battery:
– Start by reconnecting the negative terminal. -
Use a Multimeter:
– Set your multimeter to DC voltage and test the output from the battery switch to ensure you are getting a proper voltage.
– Check both the “on” and “off” positions of the switch. -
Test the Loads:
– Turn on the boat’s electrical systems (like lights and instruments) to ensure that everything powers correctly.
What Safety Tips Should You Keep in Mind?
Understanding how to wire a boat battery switch is important, but it’s equally critical to follow safety protocols. Here are some useful safety tips:
- Always wear gloves and safety glasses, especially when working with batteries to prevent acid burns or electrical shock.
- Work in a well-ventilated area to avoid inhaling harmful gases emitted by batteries.
- Stay organized and take regular breaks to reduce stress and avoid mistakes during the wiring process.
- Double-check all connections and ensure everything is secured before powering on the system.
When to Seek Professional Help?
While understanding how to wire a boat battery switch is beneficial, there are times when it’s smarter to call a professional.
If you:
- Feel uncertain about your electrical skills.
- Encounter unexpected wiring issues.
- Need help with advanced configurations.
A professional can ensure that everything is wired according to safety standards and regulations, which can save you time and prevent future issues.
Conclusion
Learning how to wire a boat battery switch safely is an essential skill for boat owners.
By following this guide, you will be able to install a battery switch that enhances your boat’s electrical reliability.
Always remember to prioritize safety and use the correct tools and materials.
With proper care and attention, you can enjoy worry-free boating experiences for years to come.
Make sure to check your work regularly and carry out maintenance to ensure your systems operate effectively.
Now you are set to confidently wire your boat battery switch!